Ever found yourself digging through piles of equipment, wasting precious time searching for that one item you need right now? Proper labeling transforms chaos into order, saving time and reducing stress.
Whether you’re a photographer with multiple camera lenses, an outdoor enthusiast with camping gear, or a DIY enthusiast with countless tools, organizing and labeling your equipment is a game-changer. The right labeling system doesn’t just help you find things faster—it protects your investment, extends the life of your gear, and makes every project or adventure run smoothly. Let’s dive into the proven strategies that will revolutionize how you manage your equipment.
🎯 Why Labeling Your Gear Matters More Than You Think
Labeling isn’t just about slapping a piece of tape on your belongings. It’s a systematic approach to creating an efficient workflow that saves hours over time. Professional organizers estimate that the average person spends nearly six months of their lifetime searching for misplaced items. When it comes to specialized gear and equipment, the stakes are even higher.
Properly labeled equipment reduces replacement costs by preventing loss, minimizes damage from improper storage, and enables quick inventory checks. For professionals, it can mean the difference between meeting a deadline and disappointing a client. For hobbyists, it transforms frustrating searches into seamless experiences.
📋 Assessing Your Gear and Planning Your System
Before you start labeling everything in sight, take time to evaluate what you actually have. Conduct a complete inventory of your equipment, grouping items by category, frequency of use, and storage requirements. This assessment phase is crucial for developing a labeling system that actually works for your specific needs.
Consider how often you access different items. High-frequency gear needs immediate visibility and accessibility, while seasonal or specialized equipment can be stored more remotely with detailed labels for easy retrieval when needed. Create categories that make intuitive sense for your workflow rather than following generic organizational advice.
Creating Categories That Actually Work
Think about your gear in terms of projects, activities, or functions rather than just physical characteristics. A photographer might organize by shoot type (portrait, landscape, studio), while a camper might categorize by season or trip duration. The key is making your system match your actual usage patterns.
Document your categories in a simple spreadsheet or note-taking app. This becomes your master reference and helps identify gaps in your collection or items that might be redundant. Update this list periodically as your needs evolve.
🏷️ Choosing the Right Labeling Tools and Materials
Not all labels are created equal. The durability, readability, and adhesive quality of your labels directly impact the longevity of your organizational system. Investing in quality labeling materials upfront saves money and frustration in the long run.
For most gear organization needs, you’ll want a combination of labeling solutions:
- Label makers: Perfect for professional-looking, durable labels that withstand handling and environmental conditions
- Waterproof labels: Essential for outdoor gear, marine equipment, or items stored in humid environments
- Color-coded systems: Allows instant visual recognition without reading text
- QR code labels: Enables detailed digital inventory tracking with smartphone scanning
- Chalkboard labels: Great for containers where contents change regularly
- Heat-resistant labels: Necessary for equipment exposed to temperature extremes
Digital Labeling and Inventory Apps
Modern gear organization benefits enormously from digital integration. Smartphone apps allow you to create comprehensive inventories with photos, purchase dates, warranty information, and storage locations. Some apps generate QR codes you can print and attach to equipment, linking physical items to detailed digital records.
These digital systems excel at tracking multiple storage locations, setting maintenance reminders, and even estimating replacement costs for insurance purposes. They’re particularly valuable for expensive equipment collections or shared gear in team environments.
✨ The Step-by-Step Labeling Process
Now that you’ve assessed your gear and gathered materials, it’s time to implement your system. Start with one category or storage area rather than trying to tackle everything at once. This focused approach prevents overwhelm and lets you refine your system before scaling up.
Clean and Prepare Surfaces
Labels stick best to clean, dry surfaces. Wipe down equipment and storage containers with appropriate cleaning solutions, removing dust, oils, and residue. For outdoor gear, ensure everything is completely dry before labeling to prevent moisture getting trapped under labels, which can cause deterioration or mold.
For textured or irregular surfaces, consider using tag-style labels that hang or attach with ties rather than adhesive labels that may not stick properly. Some gear benefits from label protectors—clear covers that shield labels from abrasion and weather.
Implementing Consistent Naming Conventions
Consistency is the backbone of any effective labeling system. Develop naming conventions that everyone who accesses the gear can understand and follow. Use clear, descriptive names rather than codes or abbreviations that require translation.
For example, instead of “CAM-L-85-1.8,” use “Camera Lens: 85mm f/1.8.” Include relevant specifications that help distinguish similar items. If you have multiple versions of the same equipment, add purchase dates or serial number endings to differentiate them.
Strategic Label Placement
Where you place labels is as important as what they say. Position labels where they’re immediately visible when accessing storage areas. For containers, place labels on the front and top so they’re readable whether stacked or lined up on shelves.
On equipment itself, choose locations that don’t interfere with functionality or grip surfaces. Avoid placing labels over ventilation holes, connection ports, or areas subject to heavy wear. For items in cases, label both the equipment and the case—never assume they’ll always stay together.
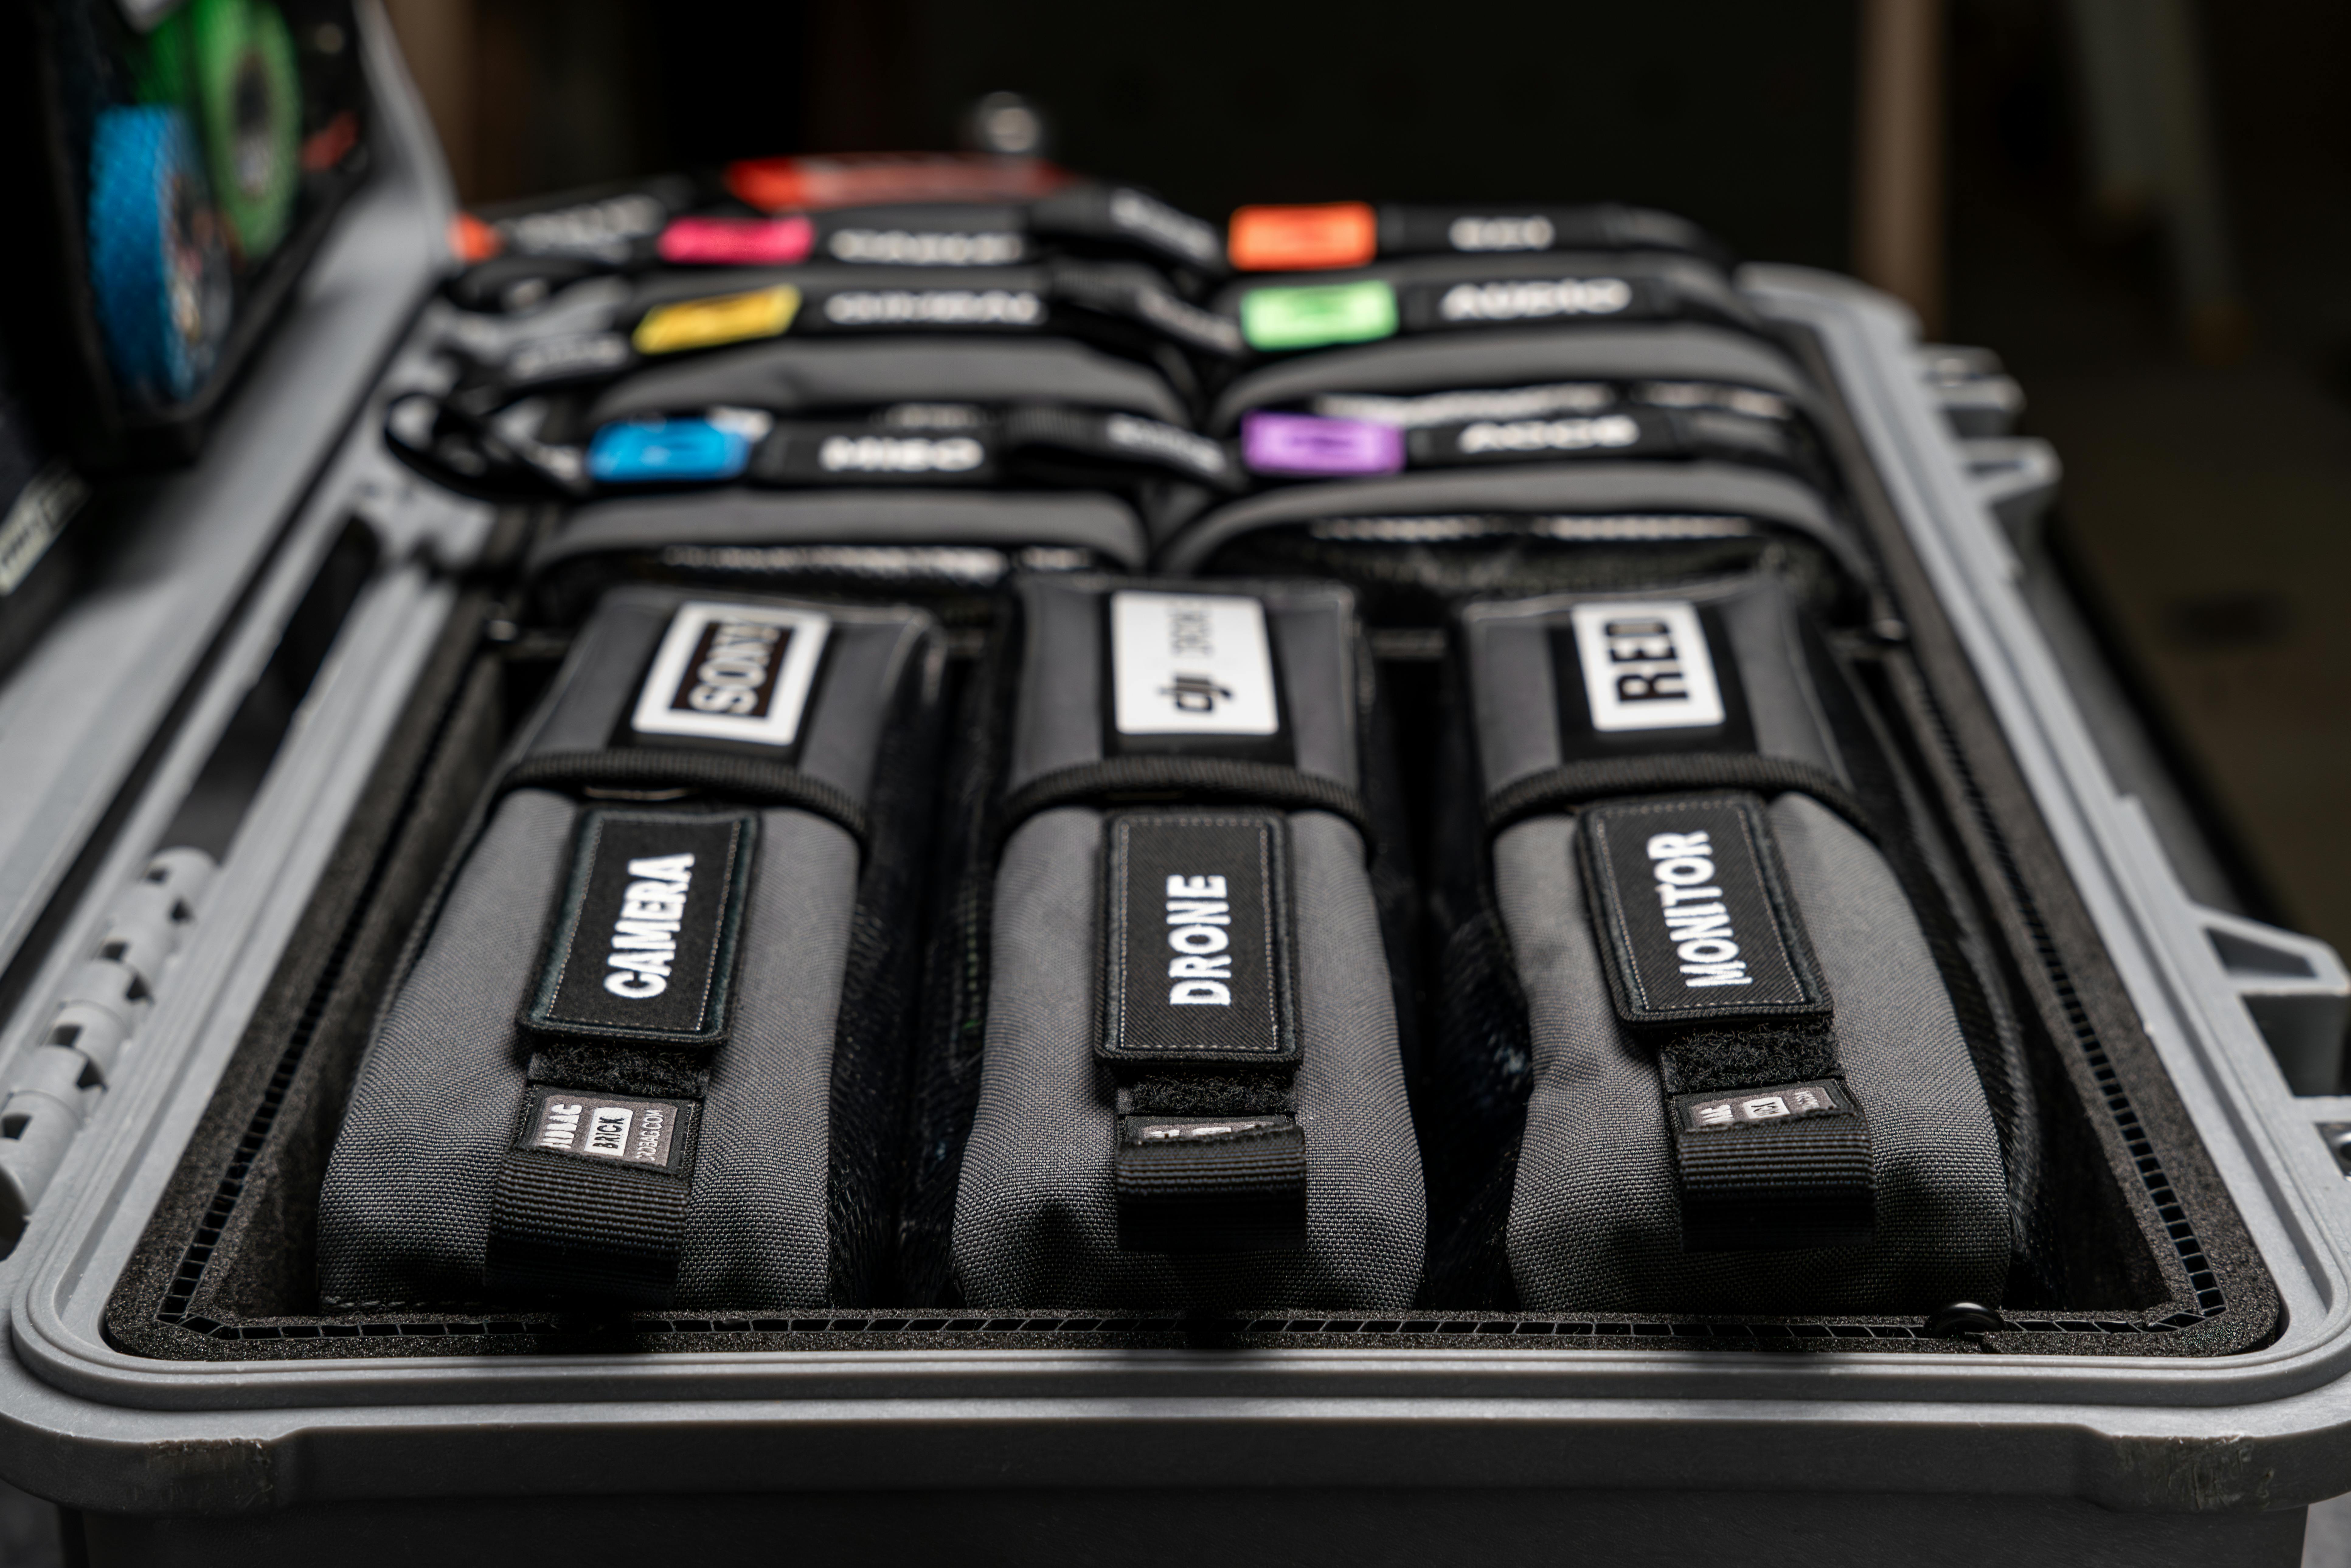
🎨 Color-Coding for Lightning-Fast Identification
Our brains process visual information faster than text, making color-coding an incredibly powerful organizational tool. Assign specific colors to categories, priority levels, or ownership if sharing gear with others. This creates an intuitive system where you can identify what you need from across the room.
Choose colors with sufficient contrast and avoid using too many—stick to five to seven distinct colors maximum. More than that becomes confusing rather than helpful. Document your color scheme prominently so anyone accessing the system understands it immediately.
Consider combining colors with shapes or patterns for accessibility. This helps colorblind users and adds another dimension to your organizational system. Stripes might indicate seasonal gear, dots could mark high-value items, and solid colors represent categories.
📦 Labeling Storage Containers and Cases
Clear containers offer obvious advantages, but they still benefit from labels indicating specific contents. Opaque containers absolutely require detailed external labeling. List major contents on labels rather than vague descriptions like “camping stuff” or “tools.”
For nested storage systems where smaller containers go inside larger ones, create an index label on the outer container listing the inner containers and their contents. This prevents unnecessary unpacking when searching for specific items.
Weatherproof and Field Storage Solutions
Gear stored outdoors, in vehicles, or taken into the field faces harsh conditions. Standard paper labels quickly deteriorate in these environments. Invest in weatherproof label materials designed for outdoor use, or create protective covers for standard labels using clear packing tape or lamination.
For extreme conditions, consider engraving or using industrial label printers that create chemically-resistant, fade-proof labels. These cost more upfront but eliminate the frustration of replacing labels repeatedly.
🔧 Maintaining Your Labeling System Over Time
Even the best labeling system degrades without maintenance. Schedule quarterly reviews to check label condition, update information, and adjust categories as your gear collection evolves. Replace damaged or faded labels immediately—a deteriorating system quickly becomes worse than no system at all.
As you acquire new equipment, label it immediately before storing. Make this an automatic part of your gear intake process. Similarly, when disposing of or selling equipment, remove labels containing personal information and update your inventory system.
Train anyone who shares access to your gear on the labeling system. Provide a quick reference guide near storage areas explaining the color coding, naming conventions, and storage locations. Consistency only works when everyone follows the same system.
💡 Advanced Labeling Techniques for Serious Organizers
Once you’ve mastered basic labeling, consider implementing advanced techniques that take organization to the next level. These methods require more initial setup but deliver exceptional long-term benefits for extensive collections.
Barcode and QR Code Integration
Creating a barcode or QR code system links physical items to comprehensive digital databases. Each code connects to detailed records including specifications, purchase information, maintenance history, and even instruction manuals. This proves invaluable for warranty claims, insurance documentation, and equipment loans.
Generate codes using free online tools or dedicated inventory apps, print them on durable labels, and attach them to gear and storage locations. Scanning codes with a smartphone instantly pulls up all associated information, eliminating manual searches through paperwork.
Location Mapping Systems
For large collections or multiple storage locations, create a visual map showing where categories of gear are stored. Assign zone codes to different areas and include these codes on labels. This becomes especially valuable when other people need to access your equipment or during relocations.
A simple floor plan with labeled storage zones works for most situations. For complex setups, photograph storage areas and annotate images with contents and label information. Keep these maps accessible both physically and digitally.
🚀 Troubleshooting Common Labeling Challenges
Even well-planned systems encounter obstacles. Labels that won’t stick properly often indicate surface preparation issues or incompatible adhesives. Clean surfaces thoroughly and choose adhesives rated for your storage environment’s temperature and humidity ranges.
If labels fade quickly, UV exposure is likely the culprit. Switch to UV-resistant label materials or store light-sensitive gear in darker areas. For labels that peel at edges, ensure you’re pressing firmly during application and consider upgrading to stronger adhesives.
When your system feels too complicated, simplify. Over-categorization creates confusion rather than clarity. Consolidate categories and focus on distinctions that matter for actual usage rather than theoretical organizational perfection.
🌟 Real-World Applications Across Different Gear Types
Photography equipment benefits from labels indicating lens focal lengths, maximum apertures, and compatible camera bodies. Include filter sizes on lenses and battery types on camera bodies. Label memory cards with capacity and speed ratings, and mark charged versus depleted batteries clearly.
Camping gear labels should note capacity ratings (tent occupancy, backpack volume), temperature ratings for sleeping bags, and expiration dates for consumables like fuel canisters and first aid supplies. Color-code by season or trip type for quick packing.
Tools and workshop equipment labels work best with size markings, power requirements, and safety information. Label drawer organizers with tool silhouettes showing where each item belongs—this makes returning tools to proper locations effortless.
Sports equipment labels should include size information, maintenance dates for items requiring regular service, and usage restrictions if gear is shared among team members with different skill levels.
🎁 Creating a Sustainable Organization Habit
The ultimate goal isn’t just organizing once—it’s maintaining organization effortlessly. Make labeling new gear automatic by keeping labeling supplies in a designated spot near where you unpack or store equipment. Spend five minutes labeling immediately rather than putting it off until “later.”
Celebrate small wins in your organizational journey. Notice how much time you save, how much less stress you feel preparing for activities, and how much more you enjoy your hobbies when not frustrated by disorganization. These positive reinforcements sustain the habit.
Share your system with others who might benefit. Explaining your approach reinforces your own understanding and might provide fresh perspectives for improvements. Join online communities focused on organization and gear management to discover new techniques and solutions.
🏁 Transform Chaos Into Clarity Starting Today
Mastering gear organization through effective labeling isn’t about achieving perfection—it’s about creating systems that serve your actual needs and lifestyle. Start small, remain consistent, and adjust as you discover what works best for your specific situation.
The time invested in proper labeling returns dividends every single day through reduced frustration, protected equipment, and the simple pleasure of accessing exactly what you need when you need it. Your future self will thank you for the organized, efficient gear management system you create today.
Remember that organization is an ongoing process, not a destination. As your interests evolve and your collection changes, your labeling system should adapt accordingly. The principles remain constant: clear identification, logical categorization, consistent implementation, and regular maintenance. Apply these fundamentals consistently, and you’ll never waste time searching for gear again.